How to Make PVC Conveyor Belt Joints: Tools, Steps

PVC conveyor belts are the backbone of countless industries—from food processing and packaging to logistics and warehousing. A properly spliced belt ensures smooth operation, extends belt life, and minimizes costly downtime. Conversely, a poorly made splice can lead to catastrophic failures, misalignment, accelerated wear of bearings and pulleys, and unexpected shutdowns that cost businesses dearly.
In this comprehensive guide, I’ll walk you through everything you need to know about making PVC conveyor belt joints—from the essential tools and equipment to step-by-step splicing procedures, with special attention to patterned (rough top / cleated) belts.
Common Splicing Methods for PVC Conveyor Belts
Before diving into tools and steps, it helps to understand the three main methods available for joining PVC conveyor belts. Each has its own advantages and ideal use cases.
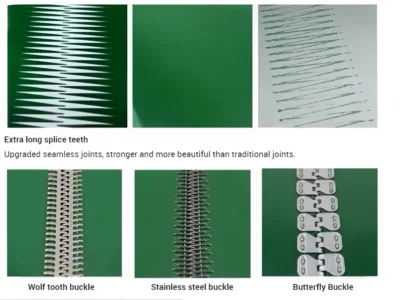
1.Metal Fastener Joint (Mechanical Splicing) – This method uses metal fasteners such as alligator clips or butterfly buckles. It allows for quick, on-site installation with no complex equipment required, making it ideal for emergency repairs, short conveyors, or temporary splicing. However, the joint is not very strong and the metal fasteners can cause stress concentration and local wear over time.
2.Cold Bonded Joint (Cold Vulcanization) – This chemical bonding method uses specialized PVC adhesives to join the belt ends. It provides a smoother surface than mechanical fasteners, reducing product jams and damage. The operation is relatively simple and cost-effective, though joint strength is not as high as hot vulcanization and bonding performance can be affected by ambient temperature and humidity.
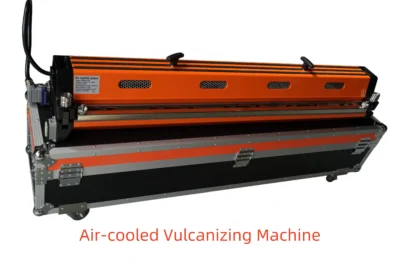
3.Hot Press Joint (Hot Vulcanization / Heat Welding) – This is widely considered the ideal method for PVC conveyor belt splicing. By using heat and pressure to fuse the belt ends at a molecular level, hot press splicing provides a strong, seamless joint with excellent stability and long service life. Thermoplastic belts like PVC utilize this property to allow heat-welded splices that exhibit a high percentage of the original belt’s flexibility and strength. The main drawback is that it requires specialized equipment and operating experience.
Tools and Equipment You’ll Need
Having the right tools for the job is non-negotiable. A professional splice requires proper preparation—using the wrong tools or taking shortcuts will almost certainly lead to splice failure.
Here is a complete list of tools and machines required for PVC conveyor belt splicing:
|
Category |
Tools & Equipment |
|---|---|
|
Cutting Tools |
Sharp utility knife or belt cutter; belt cutter with guide for clean, straight cuts; skiver for preparing belt ends |
|
Measuring Tools |
Tape measure or ruler; belt square or laser belt square to ensure cuts are perfectly perpendicular to the belt axis |
|
Surface Preparation |
Abrasive paper / sandpaper for roughening surfaces; belt ply separator (for ply separation in hot splicing) |
|
Adhesive System (Cold Bonding) |
PVC-compatible splicing adhesive (e.g., SC2000 or SK313 / UT-R40 mixture); primer (if required); brush or roller for even application |
|
Heat Welding Equipment |
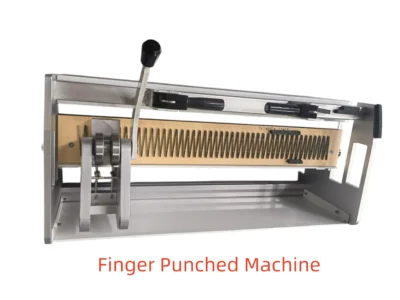
Vulcanizing press or hot press splicing machine with heating elements and pressure system; belt finger punching machine (for finger joints); hot air gun for temporary fixing |
|
Clamping Tools |
Belt clamps to hold belt ends in place during splicing and ensure even pressure distribution |
|
Cleaning Supplies |
Solvent cleaner (e.g., propylene copper / acetone); clean, lint-free cloths |
|
Safety PPE |
Cut-resistant gloves; safety goggles; mask for handling chemical adhesives |
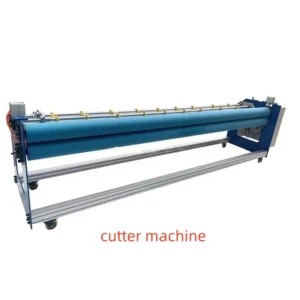
For hot press splicing specifically, a vulcanizing press is essential to ensure even heat distribution and proper bonding. Modern splice presses—like the LOYICN all-in-one system—are specifically designed for thermoplastic conveyor belts such as PVC and PU, requiring no external control boxes, air pumps, or water cooling tanks.
Step-by-Step PVC Conveyor Belt Splicing Procedure
The following procedure outlines the general workflow for a cold bonding splice, which is applicable to most light- to medium-duty applications. For hot press splicing, additional steps for heat and pressure application would be required.
Step 1: Preparation and Work Area Setup
First, find a clean, flat working surface. Remove any debris, dust, or contaminants from the area where you’ll be splicing the belt. A clean work environment prevents foreign particles from entering the splice and weakening the bond.
Perform a prior inspection to check if the belt has sufficient structural integrity to undergo splicing. If the belt is worn or damaged beyond repair in the splice area, replacement may be a better option.
Step 2: Measure and Mark the Belt
Using your measuring tape or ruler, determine the required splice length—typically around 6–8 inches on each side depending on belt width. Mark the belt where you will make the cuts. When marking, use the side of the belt as the benchmark, keeping the size consistent, the angle accurate, and the reference unified.
Step 3: Cut the Belt
Carefully cut the belt along your marked lines. The cut must be straight and perfectly perpendicular to the belt’s centerline. A clean, squared cut is critical—a jagged or angled cut can cause tracking issues, frayed edges, and premature splice failure. If you’re using a utility knife, make multiple passes to get through the belt cleanly.
Step 4: Prepare the Splice Ends
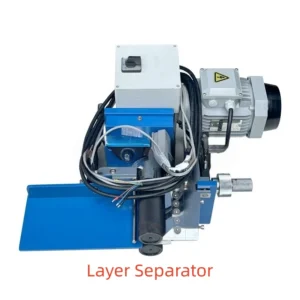
This step is crucial for achieving a strong bond. For cold bonding, the belt ends must be sanded or roughened slightly to increase surface area for adhesive adhesion. If you’re using a step or finger joint (common for hot press splicing), you’ll need to cut and peel the belt into a stepped or finger-punched pattern and separate the plies as required. A belt ply separator machine is often used for this purpose.
Step 5: Clean the Surfaces
Thoroughly clean the prepared belt ends with a solvent cleaner such as acetone or propylene copper. Remove all oil, grease, dust, and debris. Contaminated surfaces prevent proper chemical adhesion and are the leading cause of delamination in cold bonded splices.
Step 6: Apply the Adhesive
Open your splicing kit and apply the adhesive to one of the prepared splice ends according to the manufacturer’s instructions. Some adhesives require a primer to be applied first—follow the product guidelines carefully. Using a brush or roller, spread the adhesive in a thin, even layer. Avoid over-applying, as excess adhesive can create a mess and may not bond properly.
Wait for the adhesive to become tacky—this usually takes 5–10 minutes depending on product and ambient conditions.
Step 7: Join the Belt Ends
Carefully align the two prepared splice ends, making sure they fit together perfectly. The design and fabrication of the joint must ensure that the whole belt remains straight at the joint without bending—otherwise, belt deviation and tracking problems will occur.
Press the ends together firmly. Then use a roller or pressure tool to apply even pressure across the full width of the splice. This eliminates air bubbles and ensures a tight, uniform bond. If using clamps, ensure the clamping pressure is evenly distributed.
Step 8: Let the Splice Cure
Allow the splice to cure for the recommended time specified in your adhesive kit instructions. Curing can range from several hours to a full day, depending on the product used. For cold bonded joints, full strength is typically achieved after 24 hours. Do not operate the conveyor belt during the curing process—starting the machine before the adhesive is completely dry will result in total splice failure.
Step 9: Inspection and Testing
After curing, inspect the splice for any irregularities—uneven thickness, porosity, or exposed fabric. Perform a test run of the conveyor belt under empty conditions to verify proper alignment and tracking before applying full operational load.
Final Thoughts
Proper PVC conveyor belt splicing is a skill that pays for itself many times over in reduced downtime, extended belt life, and smoother operations. Whether you choose mechanical fasteners, cold bonding, or hot press vulcanization, the key to success lies in proper preparation, the right tools, and meticulous attention to detail.
------------------------------------------------------------------------
Need PVC conveyor belts or splicing equipment for your operation?
Contact us https://you-belt.com/ for expert advice on selecting the right belt and joint solution for your specific application.